In this post, we will see how to use social login into your Laravel application. oh! let me welcome you to my first official blog post on Hashnode. It takes courage to do this, I'm glad i finally did. So let's jump right in!
If you are a developer or you are learning how to code , authentication is one aspect of coding you should be familiar with. Just like typical authentication, Laravel also provides a simple, convenient way to authenticate using Laravel socialite.
Socialite currently supports authentication with Facebook, Twitter, LinkedIn, Google, Github, GitLab and BitBucket. However in this post, let's focus on authentication with Google. Although the procedure is almost the same with other social login.
First--> Let's Create a new Laravel application
>> composer create-project laravel/laravel socialLogin --prefer-dist
it may take some time to install depending on how strong your network is. So in the mean time, let's create our database. I will be using Mysql database from phpmyadmin.
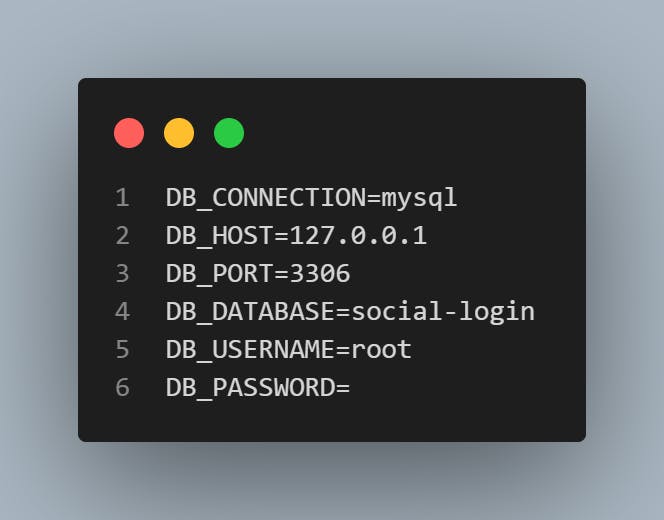
create a new database , I will name my database as "social-login". You can use whatever name you like. So navigate to your project folder, in the .env file, set your database name to the one you have created above. See the screenshot below. put password if any
Next--> We will install the bootstrap UI scaffolding for our view
Go to your terminal and follow the code below to install the Bootstrap scaffolding and generate the login/registration page.
>> php artisan ui bootstrap
>> php artisan ui bootstrap --auth
>> npm install
>> npm run dev
Once our bootstrap installation is complete,
Next--> Let's create our migration file
Navigate to database > migrations folder, in the users table, add this field below. Add the 'google_id' field in your migration file. Also make it nullable. So your users table will resemble the one in the screenshot below.
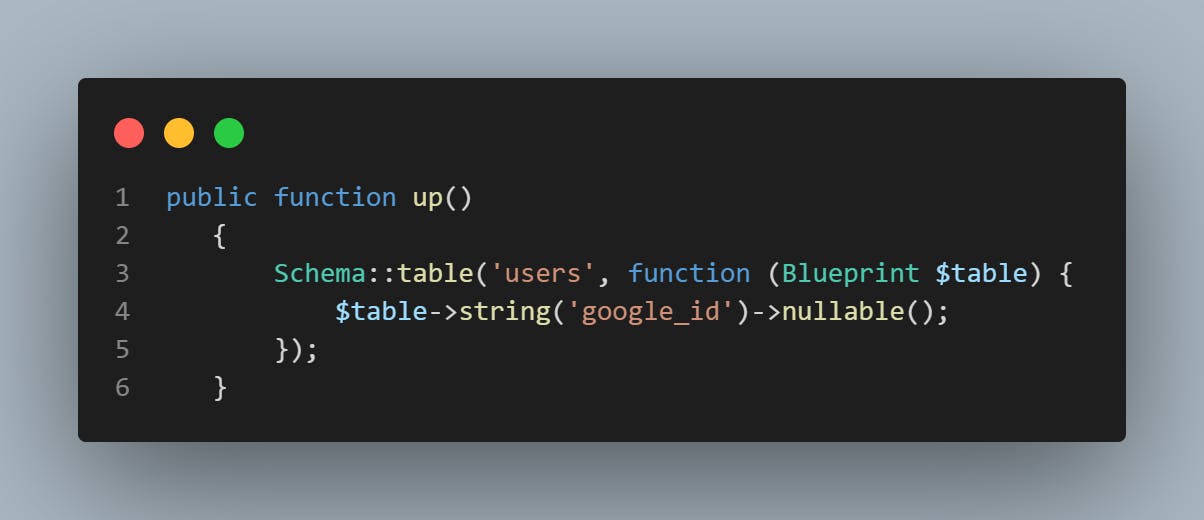 The 'google_id' field will store the data retrieved from google. After all is set, run php artisan migrate..... We migrate our database tables.
Next--> Install Socialite package
To install socialite to your application, go to your terminal and simply write this command:
>> composer require laravel/socialite
This command will install the socialite package. We need to do some configuration credentials for oauth providers before using socialite. These credentials should be placed in your applications config/app.php and should use the key google.
So navigate to config folder in your project directory, then app.php. In the 'providers' section of app.php, add the following lines of code.
Laravel\Socialite\SocialiteServiceProvider::class,
We also need to set Aliases. Just scroll down to aliases and add the following code:
'Socialite' => Laravel\Socialite\Facades\Socialite::class,
Since our migration is done and socialite package is installed,
Next--> Make changes to user model class
Navigate to app > http > models > user.php
Add the 'google_id' we created in our migrations to the $fillable for mass assignment.
The model section is ready, you don't need to touch anything in the model class again.
Next--> We need to create the App inside Google Api services.
Follow this link to create it... console.developers.google.com
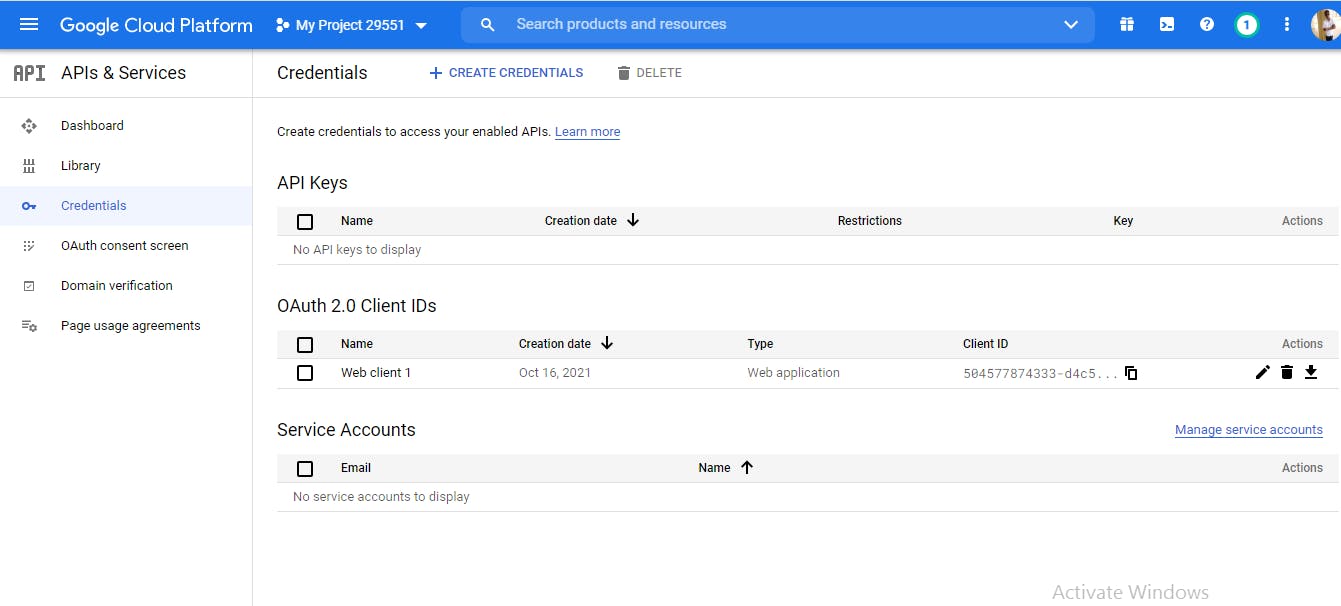 Login with your email. And inside it, create a project by clicking New Project.
After that, click on the credentials section at the sidebar. click 'create credential'. Then click the oAuth client ID.
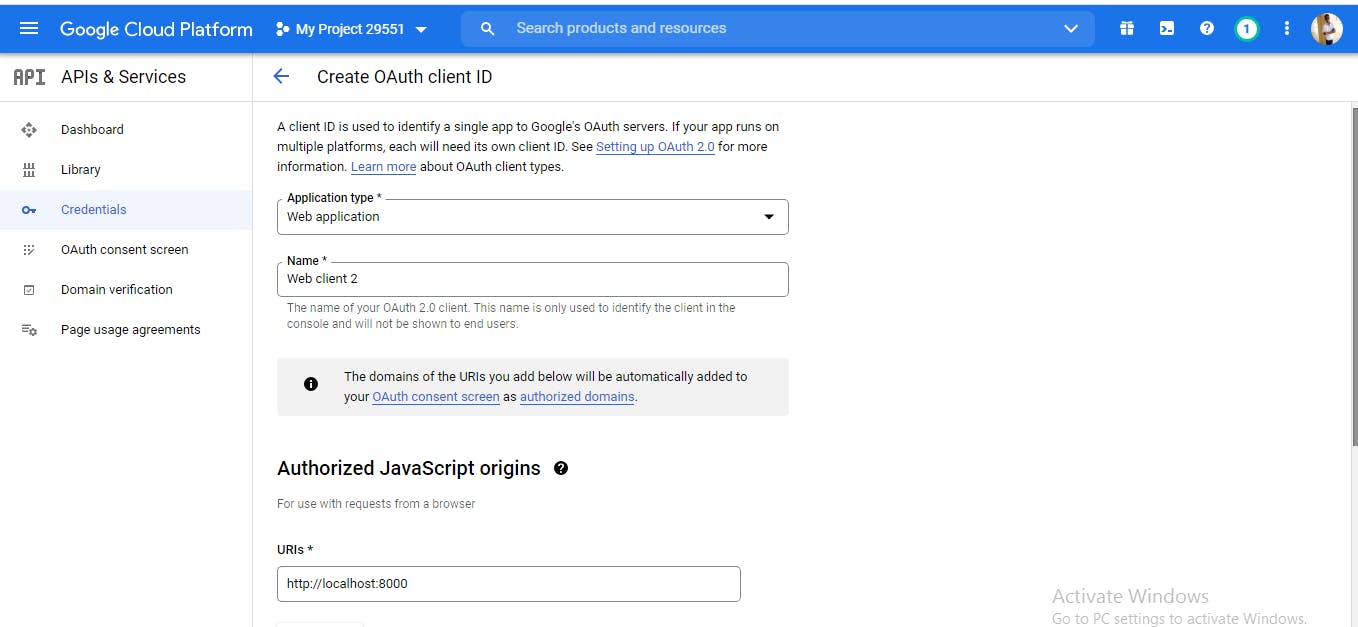
Next fill in the required field. In the application type, choose web application. In the name field, fill in the name of your application. In the authorized Javascript origin, click URI and input your web link e.g http://17.0.0.1:8000
In the authorized redirect URIs, click URI and input the redirection url link e.g 127.0.0.1/auth/google/callback. So when users login, they will be redirected to that url.
Now click on create. You will see a popup with your 'client ID' and your 'secret iD'. We shall use this two ID soon.
Now go to config/sevices.php in your Laravel project folder. In services.php we will create another array below

Now copy your client ID and paste it in your 'client_id' array. Also copy your 'secret ID' and paste in the client_secret_id section. Then make sure to include your authorize redirection link. Services.php is modified, your code should be similar to the screenshot above.
Next--> Let's create a Controller Class
Go to your terminal and type:
>> php artisan make:controller GoogleController
Now GoogleController has been created, navigate to your GoogleController class from app\http\cotrollers\GoogleController
We will create two functions in our controller class First, we will create a function redirectToGoogle. see screenshot below
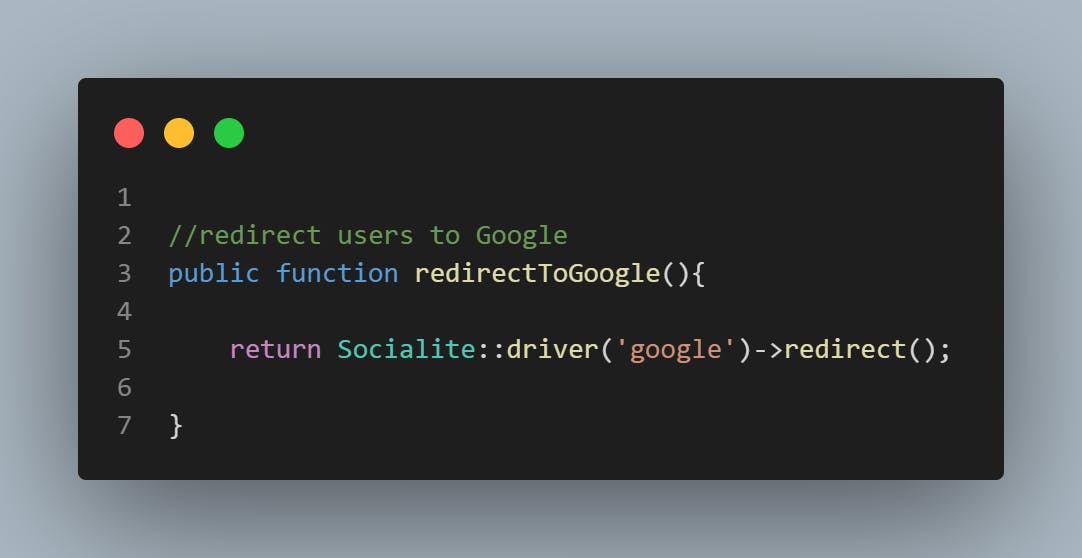 Make sure to import socialite, Auth, Exception, and user model class at the top.
Second, we will create another function to handle the callback when the user tries to login. So create another function handleGoogleCallback. Wrap it in a try/catch block. See screenshot below.
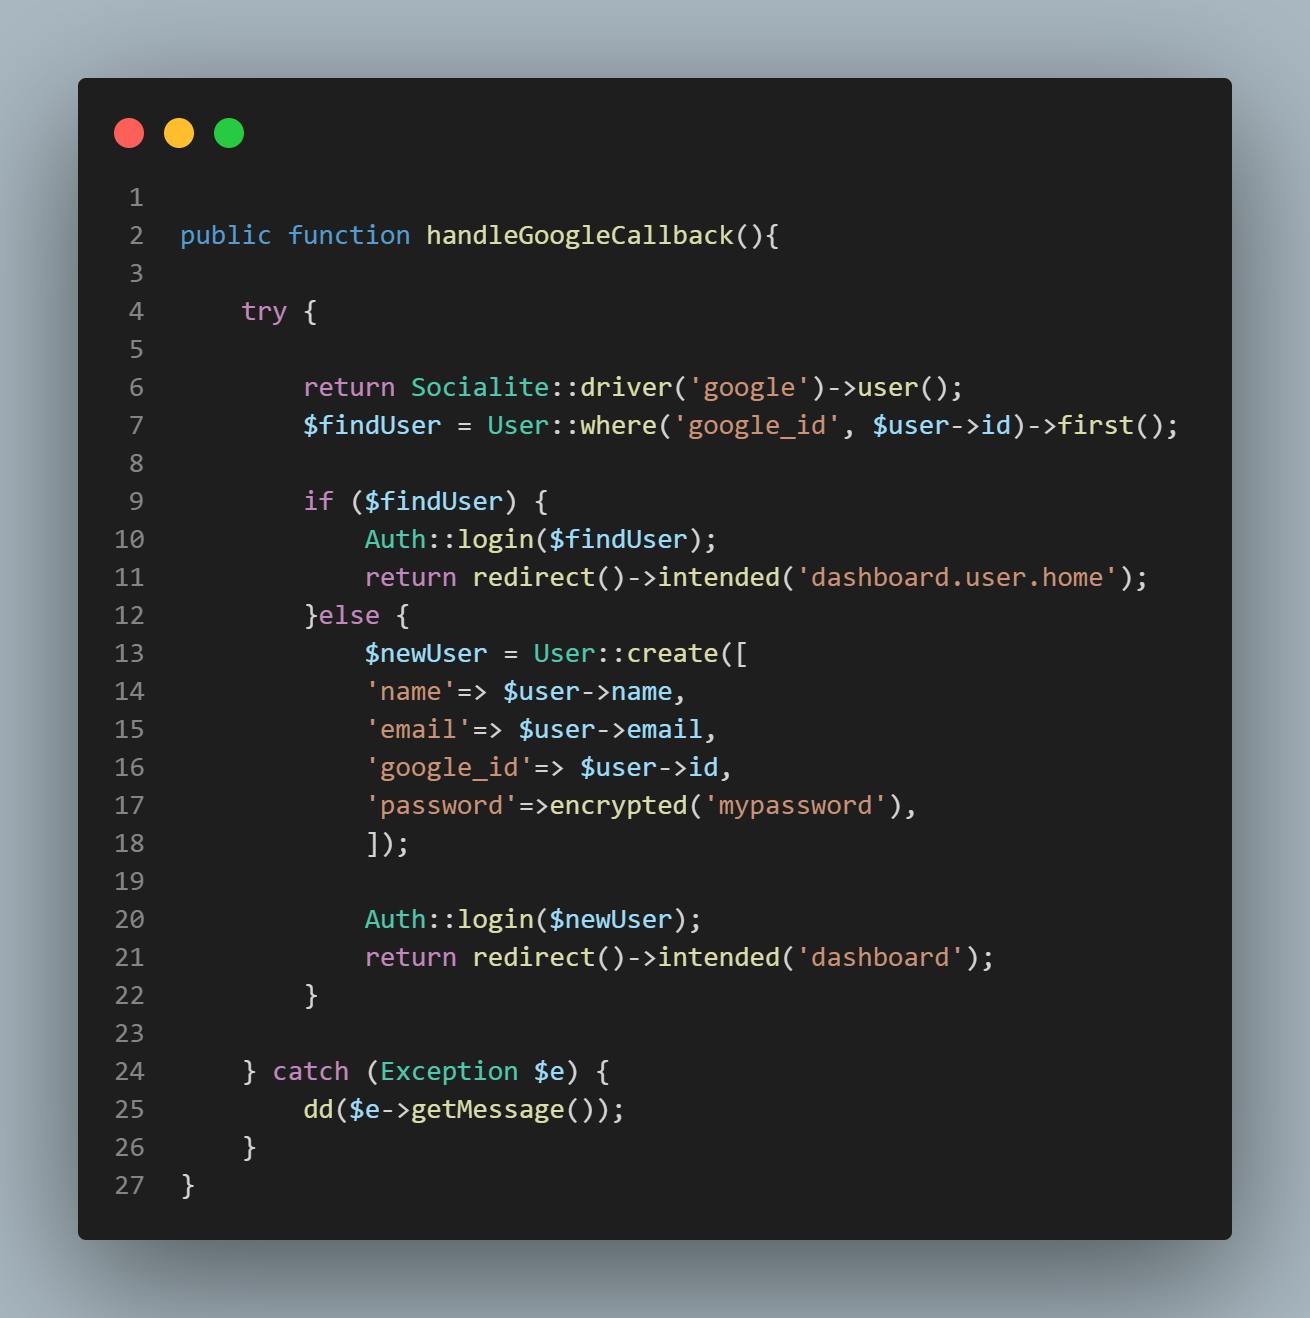 All well and done, that should be ok for the Controller
Next--> Let's navigate to web.php and create route for our application
Let's create our route for redirection using the GET method. see screenshot

This route handles redirection to Google login page Next, let's create route for callback using the GET method. see screenshot
 This route handles the response from Google if the login is successful
Next--> Lets Create a link to google in our login page. Navigate to resources > Views > login.blade.php
In our view/login.blade.php, write the below code
``` <form method="POST" action="{{route('user.doLogin')}}" autocomplete="off">
    @csrf

    <div class="mb-3">
        <label for="email" class="form-label">Email</label>
        <input type="email" class="form-control" name="email" value="{{old('email')}}">
        <span class="text-danger">@error('email'){{$message}}@enderror</span>
    </div>
    <div class="mb-3">
        <label for="password" class="form-label">Password</label>
        <input type="password" class="form-control" name="password" value="{{old('password')}}">
        <span class="text-danger">@error('password'){{$message}}@enderror</span>
    </div>
    <div class="mb-3">
        <input type="submit" value="Login" class="btn btn-success">
        <a href="{{url('auth/google')}}" class="btn btn-primary">Continue with Google</a>
    </div>
    <h5>Not yet Registered? <a href="{{route('user.register')}}">Register</a></h5>
</form> ```
Go to your terminal and start the Laravel application
>> php artisan serve
Test your login.
It has been a long article so far. Thanks for reading till the end. If you are new to web development, you may want to read " how to start web development in 2021 - A beginners' guide ". It may interest you to read 12 Top website for developers and programmers.
Kindly drop your comment to support me. Thanks!